A Window Sill Garden Oasis

In today’s fast-paced and urbanized world, finding ways to reconnect with nature has become increasingly important. However, limited space and busy schedules often hinder our ability to cultivate a traditional garden. But fear not! A window sill garden offers a perfect solution, allowing you to bring the beauty and tranquility of nature right into your home. In this blog post, we will explore the wonders of a window sill garden and discover how this small space can transform into an small oasis of greenery.

  • The Beauty of a Tiny World:

Although modest in size, a window sill garden has the power to captivate and enchant. By utilizing the vertical space provided by your window, you can create a stunning display of plants, flowers, and herbs. The vibrant colors and delicate scents will awaken your senses, offering a refreshing escape from the outside world.

  • Selecting the Right Plants:

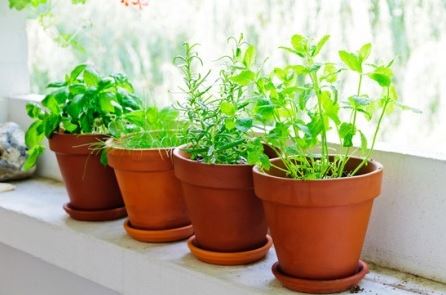
Choosing the right plants for your window sill garden is crucial. Choose varieties that thrive in limited space and prefer natural light. Some popular choices include aromatic herbs like basil, rosemary, and thyme, as well as colorful flowers like pansies, petunias, and marigolds. Additionally, succulents and cacti are excellent options for those with minimal time for maintenance, as they require less water and care.

  • Creating a Functional Space:

A window sill garden can serve more than just an aesthetic purpose. Consider the functionality of the plants you choose. Herbs, for instance, can be harvested and used in your cooking, infusing your meals with freshness and flavor. Imagine plucking a sprig of mint or snipping a few leaves of cilantro, right from your kitchen window! Furthermore, certain plants, such as lavender or chamomile, can be cultivated for their therapeutic properties, allowing you to enjoy the benefits of aromatherapy within your own home.

  • Caring for Your Window Sill Garden:

Cultivating a successful window sill garden requires regular care and attention. Ensure that your plants receive adequate sunlight by positioning them near a south-facing window or under grow lights. Water them appropriately, taking care not to over or underwater. Use well-draining soil and consider supplementing it with organic fertilizers to promote healthy growth. Regularly prune and remove dead leaves to maintain the overall health and aesthetics of your garden.

  • Enhancing Your Living Space:

Beyond the visual appeal and functional benefits, a window sill garden has the power to transform your living space into a haven of serenity. The presence of greenery and the soothing sounds of nature create a calming ambiance, reducing stress and promoting overall well-being.  A garden in your window can become a peaceful retreat, where you can escape from the demands of everyday life and find solace in the beauty of nature.

Conclusion:

A window sill garden offers an accessible way to embrace the natural world in even the smallest of living spaces. Through careful plant selection and dedicated care, you can transform your window sill into a small productive garden with greenery, fragrance, and serenity. As you watch your plants thrive and blossom, you’ll find yourself with the rewards of nature’s beauty, all from the comfort of your own home. So why wait? Embark on a delightful journey into the world of miniature gardening today!

Patio Gardening

Patio gardening has emerged as a popular trend. In this blog, we’ll delve into the art of patio gardening, exploring its benefits, practical tips, and the immense joy it brings.

  • Your private garden

With patio gardening, you can transform your outdoor area into a vibrant haven brimming with life. From colorful flowers and fragrant herbs to leafy greens and even small fruit trees, the possibilities are endless. By embracing patio gardening, you can infuse nature’s magic into your everyday life.

  • The Benefits of Patio Gardening:

Beyond the aesthetic appeal, patio gardening also provides an opportunity for gentle exercise and fresh air. Growing your own herbs and vegetables allows you to enjoy organic, homegrown produce, contributing to a healthier lifestyle.

  • Choosing the Right Plants:

When it comes to patio gardening, selecting the right plants is crucial. Consider the specific conditions of your patio, including the amount of sunlight it receives, wind exposure, and the availability of water. Select plants that thrive in your local climate and are suited to container gardening. Herbs like basil, mint, and rosemary are ideal for small spaces, while flowers like petunias, marigolds, and geraniums add vibrant colors to your patio. Don’t forget to include some leafy greens like lettuce and spinach for a fresh and nutritious touch.

  • Creative Containers and Vertical Gardening:

One of the joys of patio gardening is the opportunity to explore unique containers and vertical gardening techniques. From classic terracotta pots to repurposed items like buckets, old crates, or even pallets, let your creativity run wild. Vertical gardening, using trellises, hanging planters, or wall-mounted containers, maximizes space utilization and adds visual interest to your patio.

  • Maintenance and Care:

To ensure a thriving patio garden, regular maintenance is essential. Water your plants according to their specific needs, and don’t forget to monitor soil moisture levels. Pruning, fertilizing, and repotting when necessary, will promote healthy growth. Be mindful of pests and diseases, taking preventive measures and seeking organic solutions to protect your plants. Embrace the learning process and be patient with yourself as you develop your green thumb.

Overall, patio gardening is a delightful way to bring nature into your life. By creating a green oasis on your patio, you can enjoy the beauty of plants, reap the benefits of gardening, and find a peaceful escape from the chaos of everyday life. Whether you have a small balcony or a spacious terrace, patio gardening offers endless possibilities for creativity, self-expression, and the joy of nurturing life. So, let your imagination flourish and embark on a journey to transform your patio into a breathtaking haven of greenery.

For those of you who don’t even have a patio or exterior space, come back next week to see our blog for window gardening.

Before the Last Freeze

Here it is early April, with eighty-degree days and thirty-degree nights.  What are you going to do with that?!   The danger of an hard overnight freeze is still very real for most parts of the country.  Still your green thumbs are twitching to get out and dig around in the garden.  Well, there are a few things that you can do to get a start on planting outdoors.  

One thing that you can do is some general clean up around the yard and garden.   It sure seems that regardless of the tidying up that you did last fall, there is lots of work to be done to prepare for spring planting. 

  • Clear out all the leaves and debris that blew in.  Be gentle around early spring bulbs like daffodils and tulips.  They may be sprouting up.
  • Add soil dressings and edgings.  Freshen up your mulch and weed/plant barriers.
  • Divide perennials.  You can increase your plant quantities by splitting large clumps.  If you don’t need the extra plants, you can share.  Perennials will do better if they can grow into thinned out areas.
  •  Prune trees and shrubs.   You should do it before the buds are too full or before new growth has started.
  • Plant early, or cold hardy seeds and tubers.   Peas, potatoes, a number of leafy greens, and quite a few flowering plants do well if started before the last freeze.
  • Basic maintenance, reset walking or decorative stones that may have moved from frost heaving. Clean up that patio furniture, and repair those sections of fencing or gates that may have issues.  Inspect the deck or patio and make any needed repairs.

These are just a few things that you can do to get out of the way so you can enjoy more of the warmer weather activities that are just a few weeks away.

Greenhouses – A Couple Final Issues

In the few previous posts we have covered several variables about Greenhouse selection.  We will cover just a couple more in this post.

Let’s start with whether you will keep your greenhouse up all year round.  

Permanent or Temporary

  To state the obvious, some places around this world receive some significantly violent weather, including high winds and hail.  Greenhouses can be relatively susceptible to extreme weather.  One way to have your greenhouse survive the weather is to disassemble and store it in the months that you expect the worst conditions.   This can be a lot of work, and can take up significant storage space, but unless you have a sizable budget for a sturdy structure, this might be the best way to avoid having severe weather destroy what you did spend on a budget friendly greenhouse.
  You may also be among those who typically only start their spring garden plants, and do not plan on using the greenhouse all year round.   You may not want to have this structure taking up space in your yard if you are not using it.  So here again, disassembly and storage  is the option.

 Finally, considering what plants you are going to tend in your greenhouse is a factor.

What are You Going to Grow

…and when do you plan on growing them?    Similar to the Permanent or Temporary subject discussed just ahead of your plant choice, the budget you plan on spending on your greenhouse may limit your plant growing options.   If you have a desire to grow anything (or something specific) at anytime of the year, regardless of the climate conditions outside, then you better have the budget to build a greenhouse that can provide the appropriate environment necessary at any time.   If you don’t have that budget, then you will be limited on what plants that you have in your greenhouse at certain times of the year.  Without the proper Heating or Ventilating, weather conditions can and will impact your greenhouse conditions to a large extent.  So, your budget friendly option here is to select plants that are hardy enough to survive (and grow) in the greenhouse that you have.

   That about wraps it up, at least for now.   If you have pointers or other considerations that you would like to share about greenhouses.   Please leave them in the comments.

  We hope you enjoyed our posts about Greenhouse selection. Hopefully we may have broached a subject that provided you with information to help you purchase the perfect greenhouse for you.

Greenhouse – Size and Location

In the previous two posts we discussed heating and cooling of your greenhouse.  This post is about where you might put it, and how large do you want it.

Location actually should be the first consideration, as this could impact how big of a greenhouse you might be able to have.

You want to place your greenhouse so that it gets as much sun as possible, during the timeframes that you intend on using it.

If you have wide open space that receives full sun all year round, then you don’t have to worry much about it.  Put the biggest greenhouse you can afford there, and you’re good to go.

For those who are confined in a small yard, you do need to make the decision of where the sun shines at different times of the year.  Buildings and trees cast shade at different angles and lengths throughout the year.   At the Spring and Autumn Equinox, the sun approaches the highest in the sky with the shortest North/South angles.  The shade will be nearly straight East and West (depending on where you live).  In the Northern hemisphere, as spring moves to the Summer Solstice, the sun continues to move North, and the shade will grow to the largest Southerly angle. At the Summer Solstice, the angle switches over, and the shadows start to retreat.   The shade will reach its largest Northerly angle at the Winter Solstice.

As noted previously, you want to place your greenhouse where it will get as much sun as possible and at the point in which you want to have plants growing in it.

If you have options that have equal sunlight conditions, you might want to place it at the location that will get the lesser amount of harsh wind.

Also, you should avoid a location where flooding or water flow might occur.

Size? Well, you basically should get a greenhouse as large as your location will allow, or whatever you can afford.  You can always find ways to fill it up.  Though, one size dependency is whether you will be heating and/or cooling it.   The larger the greenhouse, the more it will take to heat or cool it. 

Next post will be about whether you want a permanent greenhouse, or one that you will disassemble and store during parts of the year.   If you intend to disassemble, then you likely have more options where you want to place it while it is up.

Will carry on in the next post.

Greenhouses in Hot Weather

Continuing on with whether you plan on using your greenhouse year-round.  In the last post we hit the talking points of providing heat when temperatures dip below freezing.   In this post we will speak on the aspect of using your greenhouse when it gets hot out there.  You will need to consider venting or cooling.  Again, depending on your ‘Regional Climate’ you may need some significant cooling features.

Hot weather use-

If you are going to use your greenhouse beyond getting your garden plants earlier in the season, you will need to ventilate it or maybe even provide a cooling method.  We mentioned in the last post that generally a greenhouse will heat the interior around 10 degrees warmer than the outside temperature.  That was sorta just an average.  When the sun shines hot on long summer days with little breeze, it can generate an even higher temperature difference.   We’re talking about hot enough to kill your plants.
 If you’re in a region where the temperature only gets to a high of around 90 degrees or so, you can probably get by with just some ventilation.  Keep the doors open, and/or the flaps on the roof.   If you expect temperatures much higher than the low 90s you will need some active ventilation or cooling.

You can reduce your overheating worry (and having to unload your greenhouse into your regular house) if you provide some active ventilation or cooling in your greenhouse.

Ventilating/cooling your greenhouse-

There are many ways to keep your greenhouse from over heating on those long hot late spring or summer days.  

  • When it is in the low 90 degrees (or below), open doors and ceiling flaps.

If it is over 90 degrees you will need active ventilation/cooling.

  • Electric fans are probably the easiest, if you have access.  You will still need to have doors and/or ceiling flaps open
  • Water mister/ionizer.  If it gets well into the 100 degrees range, you will at least need fans with a device to spray a mist into the air flow. (see the image below)
  • Water cooler, similar to water mister, but a water cooler typically pushes or pulls the air flow through a moistened filter of sorts.
  • Air conditioning, the most expensive option, but it may be necessary if you can’t have open vents.

These are some ways to make it through the summer months with a place for all those extra plants that you just love.

Check the next blog for discussions about considerations of the space that you have available for you greenhouse.

Greenhouse – Heated or Not

\For this, and the next several posts, we will go into a bit more detail about the individual subject headings from our last post.  That is, the aspects of how you might want to configure your greenhouse.

The first point was making considerations concerning your ‘Regional Climate’.  We briefly touched on whether or not you planned on using your greenhouse year round.  Year-round greenhouse use includes both extreme temperature conditions, that is both hot and cold.

Cold weather use-

I won’t suggest that a majority of those that use greenhouses only have them to start their garden plants earlier in the season, but that is definitely what a significant portion of growers use greenhouses for.   Doing this provides for the most economical and least features that you need for your greenhouse.   The most basic greenhouse without any temperature moderating devices will typically warm up the interior around 10 degrees warmer than the outside temperatures and can hold that 10 degree delta over outside temperature for a four to six hours after the sun goes down.   The temperature difference is affected by how much wind may be blowing.  More wind cuts the temperature difference significantly.  As time passes the four to six hours after sunset, the temperature difference is also diminished. The safe route is to only assume that by sunrise the greenhouse temperature will be equalized to outside temperature.  Therefore, you really need to pay attention to the forecast before you go to bed before the last freeze in your region if you don’t have any temperature moderating devises.

You can reduce your freeze worry (and having to unload your greenhouse into your regular house) if you provide some heat in your greenhouse.

Heating your greenhouse-

There are many ways to provide some heat in your greenhouse on those cold winter/early spring nights (or even days possibly).  

  • Electrical heat- Probably the easiest if you have access.  Simple electrical space heaters or heat lamps on cold temperature controllers.
  • Gas Heat- Portable gas heaters are also easy.
  • Wood stove- Burn some wood on the nights that you suspect it will freeze.  Make sure to have some heat collectors to keep it warm through the morning.
  • Solar heat- Build or purchase a solar heat collection devise.
  • Compost (Hot Beds)- provide a significant pile or layer of compost in, underneath, or along a side of your greenhouse.  Be aware of the timelines that a compost pile is hot though.
  • Candles and a heat sink- Works only for the mildest of cold times.

These are some ways to make it through the cold times, or at least, get an early start on using a greenhouse. Check the next blog for discussions about venting or cooling your greenhouse if you intend on using it in the hot summer times.

Winter and Greenhouses

Let’s continue on with another Winter time subject: greenhouses. If you are thinking about purchasing a greenhouse  See the headings for a few big hitting issues to consider for greenhouses selection.

Regional Climate

   One of the main uses of a greenhouse is to extend the growing season time.  They are effective of course, but the climate in your area will affect how beneficial a greenhouse may be for you.   The image at the bottom of this post shows zones of average year’s low temperatures.  So, a greenhouse only in zone 10 will provide you with an all year round protection from freezing without some other heat source.  In zones 9 or lower a greenhouse will not protect your plants from freezing in the coldest of months unless you provide a heat source in the coldest of times.

Space Available

   Greenhouses come in all sizes.  You may only have room for a small box that you can put on your deck or patio, or corner of your yard. You might have plenty of room for a massive greenhouse.  Most folks will suggest to purchase or construct the biggest greenhouse you can, because you probably will fill it up and want more room.

Placement on the Property

   You will need to understand the amount of sunlight that your greenhouse will get in the location that you want to place it.   Trees and buildings will cast different angles and lengths of shade at different times of the year.   You can use this to your advantage by insuring you make use of full sun in winter months while late afternoon shade will keep your greenhouse from overheating in July and August.

Permanent or Temporary

   Do you plan on leaving up (and using) the greenhouse through the summer months?  This once again has requirements relative to your regional climate.  If it gets too hot in your area you will need ventilation or a way to keep from overheating your plants.  You will also need to think about the sturdiness of the greenhouse and you will need to get one that is durable enough to withstand all the weather conditions during the time that you will use it.

What are you going to Grow

   The plant varieties that you want to grow in your greenhouse should also be considered. This is related to the first heading of Regional Climate.  Your greenhouse will need to be capable to provide the right environment for the plants that you want to grow in the months that you want to grow them in.  Most plants have different hardiness at different stages of growth, so that will also need to be planned for in the greenhouse (and its features) selection.

These are just a few of the issues that you want to consider while planning your greenhouse purchase.  We will continue this subject and go into further detail in the next few blogs.

The Right Pot for Your Plant

Our last couple posts were about houseplants and/or potted plants.  Let’s stay on that subject for now.  Let’s focus on one of the very first things that you will need when planting in pots, that is, the ‘Pot’ itself.

  The very best pots for plants’ health and vigor are made from materials that are porous. The soil and the roots need to ‘breathe’.  This may not be the same type of breathing that is needed above ground, but still, the access to air should not be completely limited to the ground surface. The types of pots that meet the ‘breathable’ requirement are made from:

  • Terra cotta
  • Un-glazed ceramic,
  • Stone
  • Coir (coconut composite)
  • Concrete.

 This is not a comprehensive list.  Wood and fiberglass (of particular specs) also work, and there are still more out there, but these are just the most available options.

 The easiest way to know if a material is porous is to consider how it holds water. 

•         If you fill a container with water and (after some time) the outside of the container darkens in color and feels cold or damp to the touch, then it is porous

•         If you fill a container with water and no matter how long it sets, the outside of the container remains completely dry, it is not porous.

Considering this attribute, you may see that perhaps the most popular material used for economical pots is not recommended for permanent or very long-term plantings.  That is, plastic is not on the list of good porous breathable planter material.  Sorry about that. That said, plastic planters are fine for temporary situations as in transportation, or when re-potting is going to be performed within a relatively short period of time (as in within a month or two).  Also, there are some plants that require high volumes of water to pass through the growing medium or that consume so much water, that non-porous pots are fine.

Good luck finding the perfect pot 😉

Happy Growing
Gardenersbud 

Winter and Your Houseplants

In the blog “Winter Seedling Starting”, I had mentioned a winter activity for your green thumbs of “paying attention to indoor potted plants”, but I didn’t speak of what that activity could be. So let’s carry on. As you spend more hours indoors, you may see that your houseplants are dusty or untidy. You can ‘clean’ your plants with a few different methods:

  • Put them in a sink or tub and shower them off. You can soak them thoroughly and let them drip dry.
  • Use a handheld sprayer and mist the leaves. Use a towel to catch the dripping water.
  • If you can hold the soil, you can tip the pot and wash them over a bucket or dip the leaves in the water.
  • For plants with sturdy leaves you can wipe them with a soft damp cloth.
  • For more delicate plants you can use a soft brush or feather duster.

You also can take the time to remove dead or yellowing leaves. You can gently pull off dead leaves by hand. If the leaf does not come off easily, you should use scissors or shears to cut them off near the stem of the leaf.
You might find yourself with time to re-pot your house plants. This is a fine activity but you will need to make the following consideration:
Winter is a time of shortened daylight hours and plants are sensitive to these ‘photoperiods’. Unless artificial (grow) lighting is provided, plants will have reduced photosynthesis. They will have reduced growth and generally look less vibrant or healthy. Take this into account by regulating your watering regimen, and resist the urge to water too much. Plants will take a couple weeks to recover from re-potting and during winter they may take a little longer. You can speed up the process of recovery with grow lights as mentioned previously.
So, enjoy the indoors and get those house plants looking great even before Spring gets here.