Blog

The Great Garden Tool Caper: A Comedy of Errors

I awoke one bright and sunny morning, the birds were chirping, the flowers were blooming, and I was filled with the spirit of a dedicated gardener. I knew that I had trusty gardening tools at my disposal.  So, I embarked on a mission to tackle the jungle that is my backyard. Little did I know, the universe had different plans for me.

The day began with high hopes and ambitious plans to transform my garden into a lush paradise. Armed with my gloves and trowel, I ventured out into the wilderness, only to realize that my pruning shears were nowhere to be found. How on earth could I be expected to trim those unruly bushes without my trusty shears? A mere mirage of a well-manicured garden was slipping through my fingers.

As I retraced my steps, I stumbled upon my rake, which had apparently taken a vacation under a heap of leaves. It had clearly decided that leaf-raking season was overrated and preferred a cozy hibernation in its leafy den. After a moment of disbelief, I couldn’t help but chuckle at the irony of this particular garden tool hiding in a pile of leaves!

With my rake in hand, I continued my quest, only to find my gardening spade masquerading as a shovel, trying to fit in with the wrong crowd. It seemed my tools were engaging in some sort of identity crisis. Perhaps they had dreams of being construction equipment? Who am I to judge?

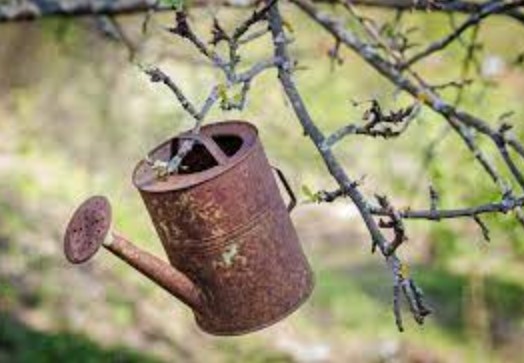
The pièce de resistance, however, was my watering can, which I concluded must have been abducted by an ambitious squirrel. I found it hanging from the branch of a tree.  It had to be a squirrel because surely I do not remember hanging it there myself.  Though, now that I think about it, that hanging location just happens to be a very handy spot.

At this point, I was almost convinced that my garden tools had developed a life of their own and were playing an elaborate game of hide-and-seek. I couldn’t help but laugh at the absurdity of it all. Who knew that gardening could be such a comedy of errors?

In the end, I managed to round up my wayward tools, convincing them that their true calling was indeed in the garden, not on a construction site or in a squirrel’s treehouse. The lesson here, dear readers, is that in the world of gardening, anything can happen. So, don’t be surprised if your gardening tools decide to go on a little adventure of their own. Just be prepared to join in on the laugh when you find them in the most unexpected places.

And remember, while we may lose our tools from time to time, the joy of gardening always finds a way to bloom, even in the most amusing of mishaps. Happy gardening, everyone!

Plant a Tree!

Some say, “Plant a Tree in months with a T.”   Of course, this is just a saying, but it has some basis that applies.   August, September, and October are generally seen as the best months to plant a lot of tree species.  While there are exceptions to the statement, let’s examine planting a tree, since it is now the middle of September.

If you want to plant a tree, now is a pretty good time to do it.

  • First, choose the right tree.

Before you start digging, it’s crucial to select the right tree for your location. Consider the following factors:

– Climate: Choose a tree species that is suitable for your local climate. Native trees are often the best choice as they are well-adapted to the conditions in your area.

– Space: Ensure you have enough space for the tree’s mature size. Think about how tall and wide the tree will grow and avoid planting it too close to buildings or other trees.

– Purpose: Decide why you want to plant a tree. Is it for shade, aesthetic beauty, or to provide fruit? Your choice will influence the type of tree you should plant.

– Potted/root ball or loose root trees.   This decision is generally based on economics or volume.   If you are looking to plant only a few trees, you can select individual tree at a nursery or other retail location.  If you are wanting to plant dozens of more trees, generally the loose root trees are much more economical.

  • Second gather the necessary tools and materials.

To plant a tree, you’ll need the following tools and materials:

– A healthy tree sapling from a reputable nursery

– A shovel

– A pair of pruning shears

– Organic compost or mulch

– Watering can or hose

– A stake and tree tie (if necessary)

  • Prepare the planting site.

Here’s how to prepare the planting site:

– Choose a location with well-draining soil and good sunlight exposure for your tree.

– Clear the area of any weeds, grass, or debris. You want the tree to have a clean start.

– Dig a hole that is two to three times wider than the root ball of the sapling and only as deep as the root ball or slightly deeper then longest root for loose root plantings.

  • Plant the Tree.

Now, it’s time to plant the tree:

– Gently remove the sapling from its container or burlap sack. Be careful not to damage the roots.

– Place the sapling in the center of the hole, making sure the top of the root ball is level with the ground surface.

– Fill the hole with soil.   The soil can be mixed with around 25% compost or maybe more if the original soil is extremely sandy or mostly clay.  Pat it down as you go to remove air pockets. Water the tree to settle the soil.

  • Mulch and water.

Mulching is essential to retain moisture and keep weeds at bay:

– Spread a layer of organic mulch or compost around the base of the tree, leaving a small gap around the trunk to prevent rot.

– Water the tree thoroughly immediately after planting and regularly thereafter. Young trees need consistent moisture to establish their roots.

  • Support the Tree (If Necessary)

If your tree is tall or in a windy area, use a stake and tree tie to support it until it’s firmly rooted. Be sure not to tie it too tightly to avoid damaging the bark.

  • Maintenance

Keep a watchful eye on your newly planted tree. Water it regularly, especially during dry spells, and prune it as necessary to remove dead or damaged branches. As it grows, your tree will reward you with shade, beauty, and a host of environmental benefits.

Planting a tree is a rewarding task, but don’t be too disappointed if there is not 100% success.  Trees are not generally expecting to be moved.  By nature, they kinda want to grow right where they start.  It may take a few attempts to get your healthy tree where you want it. By choosing the right tree, preparing the planting site, and providing proper care, you can help ensure that your tree thrives. So, grab a shovel and get started on your journey to making a green difference today!

September Gardening

Here it is, September, what is a gardener to do? The transition from late summer to early fall offers a chance to breathe new life into your garden while also preparing it for the cooler months ahead. Let’s explore the joys and practicalities of September gardening, providing you with tips and ideas to make the most of this pivotal month.

Harvest!

September is the month when many fruits and vegetables reach their peak ripeness. Take advantage of this bounty by harvesting your garden’s produce at the perfect moment. Whether it’s plump tomatoes, juicy apples, or crisp cucumbers, there’s nothing quite like the satisfaction of enjoying homegrown delights.

Cool-Season Crops

While late summer might still have some heat left, it’s a great time to start planting cool-season crops. These include leafy greens like lettuce, spinach, and arugula, as well as root vegetables such as carrots and beets. The cooler temperatures of September create ideal conditions for germination and growth.

Fall Flowers

Extend the colorful beauty of your garden well into fall by planting late-blooming flowers. Chrysanthemums, asters, and sedum are excellent choices. These blooms not only add visual interest but also attract pollinators, helping to support your garden’s ecosystem.

Divide and Conquer

September is an ideal time to divide and transplant perennial plants that have grown too large or become crowded. This process not only rejuvenates the plants but also allows you to expand your garden or share plants with friends and neighbors.

Lawn Care

Don’t forget to give your lawn some attention in September. With the cooler temperatures and increased rainfall, it’s a good time to aerate, overseed, and fertilize your lawn to ensure a lush and healthy carpet of grass in the coming months.

Prepare for Frost

As the nights grow cooler, it’s essential to keep an eye on the weather forecast for the first signs of frost. Be prepared to cover or bring in tender plants to protect them from the cold. Consider investing in frost blankets or cloths to make this process easier.

Fall Clean-Up

Start tidying up your garden by removing spent annuals and deadheading perennials. Clearing away debris not only improves the aesthetics of your garden but also reduces the risk of pests and diseases overwintering.

Plan for Spring

Lastly, use September as an opportunity to plan for the future. Consider what worked well in your garden this year and what you’d like to change or expand upon next spring. Ordering bulbs for fall planting can ensure a burst of early spring color.

September gardening is a delightful blend of harvesting the fruits of your labor, preparing for the cooler months, and enjoying the late-season blooms. By taking advantage of this transitional time, you can keep your garden vibrant and productive while setting the stage for a successful garden in the seasons to come. Embrace the opportunities that September brings and savor the unique pleasures of late-summer to early-fall gardening.

Designing Your Vegetable Garden

Yes, August seems late in the season to be talking about designing, or planning a garden, but it’s a time of year that you can take a look at what you have and think about what you might want to do next year.  You may be one who just wants a simple vegetable garden for a source of fresh produce.   However, with a little planning you can aim for a haven of natural beauty, a sanctuary for sustainable living, and a canvas for their creativity. Whether you’re a seasoned gardener or just starting out, designing an efficient and aesthetically pleasing vegetable garden is key to a successful and rewarding gardening experience. Let’s explore the essential elements of a well-planned vegetable garden that balances functionality, aesthetics, and sustainability.

  • Site Selection and Preparation

Before you dive into designing your vegetable garden, carefully choose the right location. Look for an area that receives ample sunlight (at least 6-8 hours a day), has good soil drainage, and is easily accessible for maintenance. Once you’ve selected your spot, clear away any debris, weeds, or rocks, and consider incorporating compost or organic matter to enrich the soil.

  • Garden Bed Styles

Vegetable gardens can take various forms, from traditional rows to raised beds, square-foot gardening, and even container gardening. Each style has its benefits, so choose one that aligns with your space, preferences, and physical abilities.

  1. Raised Beds: These offer better soil drainage, reduced soil compaction, and easier maintenance. They are ideal for small spaces or areas with poor soil quality.
  2. Square-Foot Gardening: This method divides the garden into a grid of square-foot sections, optimizing space and plant placement while minimizing waste.
  3. Container Gardening: Perfect for urban settings or limited space, containers allow you to grow vegetables on patios, balconies, or even windowsills.
  • Crop Rotation and Companion Planting

To promote healthy plant growth and prevent soil-borne diseases, practice crop rotation by changing the placement of different plant families each season. Additionally, companion planting involves placing compatible plants together to enhance growth, deter pests, and improve flavor. For instance, planting marigolds near tomatoes can help repel nematodes, while growing basil alongside tomatoes can enhance their taste.

  • Paths and Walkways

Incorporate well-designed paths and walkways to provide easy access to every part of your garden. Use materials like gravel, wood chips, or steppingstones to prevent soil compaction and reduce weed growth. Thoughtfully placed paths also add visual appeal and organization to your garden layout.

  • Vertical Gardening

Make the most of your space by utilizing vertical gardening techniques. Trellises, cages, and stakes can support climbing plants like tomatoes, cucumbers, and beans, freeing up ground space for other crops. Vertical gardening not only maximizes your yield but also creates a lush and visually striking garden design.

  • Watering and Irrigation

Efficient watering is crucial for a thriving vegetable garden. Consider installing a drip irrigation system that delivers water directly to the roots, minimizing waste and reducing the risk of fungal diseases. Mulching around plants helps retain moisture, suppress weeds, and maintain a consistent soil temperature.

  • Focal Points and Aesthetics

While functionality is key, don’t overlook the aesthetics of your vegetable garden. You can integrate decorative elements like colorful flowers, ornamental grasses, or artistic garden sculptures to create visual interest and focal points. Designing your garden with an artistic eye will transform your space into a harmonious blend of utility and beauty.

You can take the opportunity now to plan for next year. Select the right site, choose the suitable garden bed style, consider crop rotation and companion planting, optimize paths and walkways, embrace some vertical gardening, and incorporate aesthetics.  You can create a productive and enchanting space that yields bountiful harvests and brings joy to your gardening journey. Remember, your vegetable garden layout is a canvas for your imagination – let it reflect your personality, values, and passion for sustainable living.

Surviving the Summer Heat: Essential Garden Care Tips for Hot Days

As the sun reaches its peak and temperatures soar, your garden faces the scorching challenges of summer. The intense heat can take a toll on your plants and leave your once lush paradise looking parched and wilted.  With a little extra care and attention, you can keep your garden thriving through even the hottest of days. Let’s explore some essential tips to ensure your green oasis remains vibrant and flourishing during the sizzling summer months.

  • Water Wisely

Hydration is key during the sweltering heat, and your garden is no exception. Water your plants deeply and thoroughly early in the morning or late in the evening when temperatures are lower. This helps prevent rapid evaporation and ensures the roots absorb the moisture effectively. Avoid watering during the peak heat of the day to prevent scorching and the formation of mold or mildew. Morning watering is best if you can.  If you don’t have the time to water in the morning, you can use a watering timer that can do the job at the optimum time.

  • Smart Watering Systems

Consider investing in a drip irrigation system or soaker hoses. These water-efficient options deliver water directly to the base of plants, reducing water waste and evaporation. As noted in the previous bullet, these watering systems could be installed with a timer.

  • Mulch Matters

Mulching is your garden’s best friend in the summertime. Applying a layer of organic mulch, such as wood chips, straw, or compost, around your plants helps conserve moisture, regulates soil temperature, and reduces weed growth. A 2-4 inch layer of mulch can make a significant difference in keeping the soil cool and hydrated.

  • Heat-Resistant Plants

Consider planting drought-tolerant and heat-resistant varieties suitable for your region. Native plants are often better equipped to withstand hot summers since they have adapted to local conditions. Some excellent choices might include succulents, lavender, yarrow, and coneflowers. These plants not only withstand heat,  but also attract beneficial pollinators.

  • Shade Solutions

Just like us, plants appreciate some shade during the hottest parts of the day. You can use shade cloth or temporary structures like umbrellas to provide relief to sensitive plants. Additionally, arranging taller plants strategically can create natural shading for their shorter neighbors.

  • Regular Maintenance:**

During summer, your garden may experience rapid growth, which means increased maintenance. Regularly deadhead flowers, prune overgrown branches, and remove weeds to encourage healthy growth and discourage pests. By keeping your garden tidy, you also reduce competition for water and nutrients.

  • Compost Love

Healthy soil retains moisture better, so it’s crucial to keep your soil well-nourished during summer. Regularly adding compost enriches the soil with essential nutrients, improves its water retention capacity, and encourages beneficial microbial activity. Adding compost tea to your watering regimen is also a great idea. Doing this will result in a thriving garden that can better handle heat stress.

  • Watch for Warning Signs

Keep a vigilant eye on your plants for signs of heat stress. Wilting, yellowing leaves, and stunted growth are indicators that your plants need help. If you notice these signs, provide them with some extra shade and water until they recover.

  With these tips for the heat of summer, you can ensure your garden remains a vibrant and thriving oasis. By watering wisely, providing shade, choosing the right plants, and maintaining your garden regularly, you can beat the summer sizzle and enjoy the beauty of your lush green haven throughout the hottest months of the year. Remember, a little extra care during summer will pay off with a garden that flourishes and rewards you with its splendor. Happy gardening!

Tomatoes with Green Shoulders and how this Phenomenon Impacts Varieties Today

Tomatoes are beloved for their vibrant colors, juicy flesh, and delicious flavor. However, there is one phenomenon that can sometimes puzzle gardeners and enthusiasts alike: tomatoes with green shoulders. These are tomatoes that develop a greenish or yellowish tint around the stem end, while the rest of the fruit ripens to its characteristic color. In this blog, we will delve into the causes of green shoulders in tomatoes, discuss their impact on taste and quality.

Green shoulders occur when the area around the stem end of the tomato fails to fully ripen and remains green while the rest of the fruit turns ripe. It often manifests as a distinct greenish or yellowish coloration on the top portion of the tomato.

Prior to the 1930s nearly all tomato varieties produced green shoulders.  In 1930, an agricultural experiment station in Fargo North Dakota recognized some plants had a mutation they called ‘uniform ripening’ and they successfully produced a hybrid tomato variety they called All Red.  It wasn’t long before all tomato producers were trying to eliminate the green shoulders on their tomatoes.  It was realized that the mutation that was present in the All Red was also present in other varieties but only in some individual plants.   Producers started grafting off these plants to reproduce the mutation. Thus, the uniform ripening genes eventually made their way into nearly all tomato varieties.

The mutation that causes fruit to look better doesn’t come without a cost.   Typically, tomatoes that do not have the mutation have more flavor overall.  They are generally tangier and have larger flavor bands from umami to sweet.

There are some factors that still impact Green Shoulders in today’s tomatoes such as:

  • Exposure to Sunlight: Intense or prolonged exposure to direct sunlight, especially during hot weather, can cause the top part of the tomato to become sunburned. The heat and light can hinder the ripening process, resulting in green shoulders.
  • Temperature Fluctuations: Drastic temperature fluctuations, particularly during the period when the tomato is forming and developing, can disrupt the ripening process and lead to uneven coloration.
  •  Nutrient Imbalances: Imbalances in essential nutrients, particularly calcium, can affect the tomato’s ripening process and contribute to the development of green shoulders.

One can manage Green Shoulders easily with today’s tomato varieties.

  1. Variety Selection: There are varieties that tend to have less or more resistance to Green Shoulders.  You can research and select varieties known for their uniform ripening characteristics.
  2. Provide Shade: If your tomatoes are exposed to intense sunlight, consider providing some shade using shade cloth or by strategically positioning taller plants to cast shadows during the hottest parts of the day.
  3. Take Steps to Maintain Consistent Temperatures: Provide a stable and moderate growing environment. Mulching around the base of the plants can help regulate soil temperatures and reduce stress.
  4. Proper Nutrition: Ensure your tomato plants receive adequate and balanced nutrition. Test your soil’s nutrient levels and make amendments accordingly. Adequate calcium levels can be particularly important for preventing green shoulders, so consider adding a calcium supplement or using calcium-rich organic fertilizers.
  5. Harvesting: If you notice green shoulders developing on your tomatoes, you can harvest them slightly earlier than fully ripe. Allow them to ripen indoors at room temperature, away from direct sunlight. This way, you can enjoy the delicious flavors of the tomato while minimizing the visual impact of the green shoulders.

Tomatoes with green shoulders may pose a mystery for many gardeners, but with a deeper understanding of the causes and potential remedies, you can effectively manage and reduce their occurrence. By selecting suitable varieties, providing adequate shade, maintaining consistent temperatures, ensuring proper nutrition, and making slight adjustments to your harvesting approach, you can continue to enjoy the bounty of your tomato harvest, green shoulders and all. Happy gardening and tomato tasting!

Resilient Gardens: Embracing Heat and Drought Resistance

In our last blog we wrote about how to prepare your garden for your absence.  Here, we will speak about a resilient garden overall, specifically dealing with heat and drought resistance.   You can create beautiful, thriving garden that can withstand long periods of extreme heat and low rain. We will explore the principles and techniques of heat and drought-resistant gardening and how you can implement them in your own green space.

1. Plant Selection:

Choosing the right plants is the foundation of a heat and drought-resistant garden. Opt for native or adapted species that naturally thrive in your local climate. These plants have evolved to withstand the extremes of heat and limited water availability, making them more resilient. Look for characteristics such as deep root systems, waxy or silver-gray leaves, and succulent structures, as they are often indicators of drought tolerance. Incorporate a mix of perennials, shrubs, and grasses to create a diverse and visually appealing landscape.  As far as vegetables are concerned, choose varieties that are promoted for high temperatures and limited water.  Such as:

  • Tomatoes (varieties like ‘Heatwave II,’ ‘Solar Fire,’ and ‘Sunmaster’)
  • Peppers (varieties like ‘Jalapeno M,’ ‘Cubanelle,’ and ‘Pimiento’)
  • Eggplant (varieties like ‘Black Beauty’ and ‘Florida High Bush’)
  • Okra (varieties like ‘Clemson Spineless’ and ‘Emerald’)
  • Sweet potatoes (varieties like ‘Beauregard’ and ‘Georgia Jet’)
  • Cowpeas (varieties like ‘California Blackeye’ and ‘Pinkeye Purple Hull’)
  • Mustard greens (varieties like ‘Southern Giant Curled’ and ‘Florida Broadleaf’)
  • Swiss chard (varieties like ‘Bright Lights’ and ‘Fordhook Giant’)
  • Zucchini and summer squash (varieties like ‘Black Beauty’ and ‘Yellow Crookneck’)ter.  Such as:

2. Soil Preparation:

Healthy soil is the key to a thriving garden, especially in hot and arid conditions. Prioritize soil improvement by incorporating organic matter such as compost, well-rotted manure, or leaf mold. Amending the soil with organic materials improves its water retention capacity, promotes root growth, and enhances overall plant health. Additionally, consider adding a layer of mulch around your plants to help conserve moisture, suppress weeds, and regulate soil temperature.

3. Efficient Watering Techniques:

Water conservation is crucial in heat and drought-resistant gardening. Implement smart watering techniques to minimize water usage while maximizing plant health. Drip irrigation systems and soaker hoses deliver water directly to the root zone, reducing evaporation and water waste. Install rain barrels to collect and store rainwater, which can be used during dry periods. Additionally, consider grouping plants with similar water requirements together to ensure efficient irrigation.

4. Sustainable Garden Design:

Incorporate sustainable design elements into your garden to further enhance its heat and drought resistance. Implement shade structures, such as pergolas or trellises covered with shade cloth, to protect delicate plants from intense sunlight and reduce evaporation. Create windbreaks using hedges or fences to shield your garden from drying winds. Utilize natural wind patterns to your advantage by positioning taller plants or structures on the windward side, thus creating a microclimate of increased humidity and decreased evaporation.

5. Mulching and Groundcover:

Mulching plays a vital role in maintaining soil moisture and regulating temperature. Apply a layer of organic mulch, such as wood chips or straw, around your plants to conserve water and suppress weed growth. Additionally, consider incorporating drought-tolerant groundcovers, such as creeping thyme or sedum, to provide natural shade and further reduce soil moisture loss.

6. Regular Maintenance:

Proper maintenance is essential to ensure the longevity and health of your heat and drought-resistant garden. Regularly inspect your plants for signs of stress or disease, and promptly address any issues. Prune and remove dead or damaged plant material to promote airflow and reduce water competition among neighboring plants. Adjust watering schedules and techniques based on weather conditions, and be mindful of local water restrictions, if applicable.

By selecting appropriate plant species, improving soil health, implementing efficient watering techniques, and incorporating sustainable design elements, you can create a garden that thrives in the face of heatwaves and droughts.  You will enjoy a garden that is beautiful even if the weather is treacherously hot and dry.

Your Garden and Your Vacation

Gardening is an enjoyable, productive, and fulfilling hobby, but to be successful it does take a commitment of your time.  There are times that you might feel a bit confined by the commitment.  Say for instance that you would like to go on a vacation for more than just a weekend. Leaving your garden unattended might make you anxious, fearing the worst for your beloved plants. However, with a little planning and preparation, you can ensure your garden thrives even in your absence. In this blog post, we’ll explore some essential tips and tricks to help you maintain a healthy garden while you’re away on vacation.

Prepare in Advance:

The key to a successful vacation for both you and your garden lies in early preparation. Start by assessing the state of your garden and identifying any potential issues that might arise during your absence. Take note of any vulnerable plants, diseases, or pest problems that require attention. Addressing these matters before leaving will help prevent any surprises upon your return.

Watering:

  • Proper hydration is crucial for your plants’ survival, especially during hot summer days. To keep your plants hydrated, there are a few options to consider:
    • Self-Watering Systems: Invest in self-watering systems such as drip irrigation or soaker hoses. These systems provide a slow, consistent water supply directly to the plants’ roots, mimicking natural rainfall.
    • Watering Spikes: Watering spikes or globes are useful for individual potted plants. Fill them with water, insert them into the soil, and let them slowly release moisture as needed.
    • Mulching: Apply a layer of organic mulch around your plants to help retain moisture in the soil. Mulching reduces evaporation, keeps the soil cooler, and minimizes weed growth.

Pruning and Deadheading:

  • Before you leave, spend some time pruning your plants and removing dead flowers (a process known as deadheading). By doing so, you’ll help redirect the plant’s energy toward growth and prevent any potential diseases or pest infestations. Additionally, pruning can promote better air circulation, reducing the risk of fungal problems.

Pest Control:

  • Don’t let pesky insects ruin your garden while you’re away. Here’s what you can do:
    • Natural Repellents: Introduce natural pest repellents, such as companion plants or insect-repelling herbs like lavender, marigold, or basil, to deter pests from your garden.
    • Beneficial Insects: Encourage the presence of beneficial insects, such as ladybugs, lacewings, or praying mantises that prey on harmful pests. Consider purchasing and releasing them before leaving.
    • Neem Oil Spray: Use a neem oil spray as a preventive measure against common garden pests. It acts as a natural insecticide while being safe for plants, animals, and beneficial insects.

Enlist the Help of a Gardening Friend:

  • If possible, seek assistance from a trusted friend or neighbor with gardening experience. Brief them on your garden’s needs, watering schedule, and any specific tasks that may arise during your absence. They can help monitor the garden, provide extra care if needed, and promptly address any unexpected issues.
    • If you would like to minimize your friend’s need to check your garden on a specific schedule, you could install a remote camera that you could view from your phone.  You could view your garden periodically and if you see an issue, you could then ask your friend to go to your garden and address it.  You would want to inform your friend ahead of time of this arrangement.

Harvest and Store Produce:

  • If you have edible crops ready for harvest, gather them before you leave. Enjoy the fruits of your labor or consider donating them to friends, family, or local food banks. Harvesting ensures you won’t return to overripe or rotting produce.

Conclusion:

A vacation should be a time to relax and unwind, knowing that your garden is well taken care of. By following these tips and making some effort in advance, you can enjoy your time away while ensuring your plants stay healthy and vibrant. With a little planning and support, you’ll return to a garden that is still beautiful when you return from vacation.

Using Compost in a Garden

Let’s talk about how to use compost in your garden, primarily in a general overall application.  We will follow up with some more specific uses afterward.

Using compost in garden soil is a great way to improve its fertility, structure, and overall health. Compost is rich in organic matter that adds beneficial material to the soil, enhances moisture retention, and supports beneficial microbial activity. Here’s a guide on how to use compost in your garden soil:

  • Determine the amount needed: Consider the condition of your soil and the specific needs of your plants. As a general guideline, aim to add 2 to 3 inches (5 to 7.5 cm) of compost to the top layer of soil.
  • Prepare the garden bed: Remove weeds, rocks, or debris from the garden bed. Loosen the soil with a garden fork or tiller to a depth of about 8 to 12 inches (20 to 30 cm).
  • Apply the compost: Spread the compost evenly over the garden bed. Use a garden rake or shovel to distribute it across the soil surface.
  • Mix the compost into the soil: Using a garden fork, tiller, or shovel, incorporate the compost into the top 6 to 8 inches (15 to 20 cm) of soil. This will ensure that the compost is thoroughly blended with the existing soil.
  • Level the bed: Smooth the soil surface with a rake, removing any clumps or large chunks of compost that have not fully decomposed.
  • Water the bed: After incorporating the compost, water the garden bed thoroughly. This will help settle the soil and allow the compost to start releasing its nutrients.
  • Planting and maintenance: Once the compost has been mixed in, you can proceed with planting your desired plants or seeds. Water the garden regularly, as compost-amended soil tends to retain moisture better than unamended soil.

Additional tips:

– Compost can also be used as a top dressing around existing plants. Apply a thin layer of compost (about ½ to 1 inch) around the base of plants, avoiding direct contact with stems or trunks.

– You can make spot applications as well.  If you are planting seedlings, you can dig down well past the existing root depth and mix in more compost where the mature plants’ roots will grow into.

-Those two previous applications can be used on either existing potted plants, or new pot plantings.

– If you have heavy clay soil, adding compost can help improve drainage and aeration. Repeat the compost application annually or as needed to maintain soil health.

Using compost in your garden soil is an ongoing process that helps build and maintain healthy soil over time. Regularly adding compost and practicing good gardening techniques will contribute to the overall productivity and vitality of your garden.

Late Spring Vegetable Gardens

Late spring is a prime time for vegetable gardening, as the soil has warmed up, and the threat of frost has passed. It’s the perfect opportunity to dig your hands into the earth and cultivate a vibrant and productive vegetable garden. In this blog, we will explore the joys and benefits of late spring vegetable gardening and provide you with essential tips to maximize your harvest.

  1. Selecting the Right Vegetables: Late spring offers a wide range of vegetable options that thrive in the warmer temperatures. Some popular choices include tomatoes, cucumbers, peppers, beans, corn, zucchini, and various leafy greens like lettuce, spinach, and kale. Consider your climate and the specific requirements of each vegetable to ensure a successful harvest.
  2. Soil Preparation: Before planting your vegetables, it’s crucial to prepare the soil properly. Start by removing any weeds and debris. Loosen the soil using a garden fork or tiller, breaking up any clumps and incorporating organic matter such as compost or well-rotted manure. This enriches the soil, improves drainage, and provides essential nutrients for your plants.
  3. Planting Techniques: Follow the recommended spacing guidelines for each vegetable to ensure proper growth and airflow. Some vegetables, like tomatoes and cucumbers, may require staking or trellising to support their vines. Planting in raised beds or containers can help control weeds and provide better drainage, particularly for vegetables that prefer well-drained soil.
  4. Watering and Mulching: Consistent and adequate watering is crucial for a successful vegetable garden. Water deeply, ensuring that the soil is evenly moist but not waterlogged. Mulching around your plants helps retain moisture, suppress weeds, and regulate soil temperature. Organic mulches like straw or wood chips are excellent choices.
  5. Pest and Disease Management: Late spring can bring an influx of pests and diseases, so it’s important to be proactive. Regularly inspect your plants for signs of pests such as aphids, slugs, or caterpillars. Consider using natural pest control methods like hand-picking, companion planting, or organic insecticides if necessary. Proper spacing and good airflow can also help prevent fungal diseases.
  6. Harvesting Tips: As your vegetables mature, it’s essential to harvest them at their peak to enjoy their flavors and encourage continuous production. Learn the specific harvesting techniques for each vegetable, such as picking tomatoes when they are firm and fully colored, or harvesting leafy greens by cutting outer leaves to promote new growth.

Late spring provides the ideal conditions for a thriving vegetable garden. By carefully selecting the right vegetables, preparing the soil, and implementing proper planting and care techniques, you can reap a bountiful harvest of fresh and delicious produce. Embrace the joys of gardening and savor the rewards of your labor as you enjoy the flavors and nutritional benefits of homegrown vegetables throughout the season.